Well, this posting has nothing to do with trains. I didn't work on the layout at all, but instead spent Saturday with Vineyard's mercy response team in Cedar Rapids, Iowa, helping w/ flood-damaged houses there. I was really not expecting the level of damage this town has suffered - block after block of empty homes and deserted streets (except for the Salvation Army truck distributing food & water to folks gutting houses).
It was a good experience. Our national arm of our church - Vineyard USA - has set up a full-time operation in Cedar Rapids (modeled on it's continuing program in New Orleans), managing volunteer teams that go out and help families with flood-damaged homes. The water rose to 10' in many neighborhoods, and many of the homes being worked on were flooded to the top of the first floor.
We sent about 40 people out, but stayed only for Friday night and Saturday. My group of 6 gutted a house that hadn't been touched since the floods in mid-June, and it was RIPE! It was low-income rental managed by a Four Square church (whose building is also trashed). It was great old frame home, built around 1900, very large. It had been coverted into two apartments, and the lower one's family apparently just ran and left most of their stuff. It was pretty heart-breaking to drag out piles of clothes, toys, electronics, school backpacks still full of books, etc - a whole family's life of belongings, nearly. We pulled the belongings, appliances, and other stuff out, then ripped out the carpet, then started demoing the interior of the first floor down to the studs.
They tell me houses like this can be saved, and it would be nice - it's a great old place. But the damage was pretty bad.
Anyway - perhaps back to trains next week!
Jul 28, 2008
Jul 21, 2008
Still in fascia land...
I must admit I've been outdoors more these last few weeks, given the great weather, so the layout is languishing a bit. I did get some more work done this weekend - still working on fascia. I installed three more drop-down panels - two at Dolores, and one at Hesperus - although these will be secured with screws instead of magnets, as I don't intend to open them unless I'm working under the layout in those areas.
With these three completed, there's a only a couple small areas left now.
With these three completed, there's a only a couple small areas left now.

Jun 9, 2008
Fascia time
Shoot... has it really been three months since I posted here?
I (mostly) finished the 4 diesels I've been remotoring... decals are done, headlights are done, decoders are installed, and they are reassembled and operating. There's a few final delicate details (air brake hoses, cut levels, etc) that aren't added yet, and weathering isn't done, but other than that they're ready for the layout.
The layout, on the other hand, is back in the land of carpentry, as I've been adding fascia boards to most of the layout. I'm using untempered 1/8" masonite, and so far I've got about half of the layout done. There's a few sections that will have to wait, since wiring in the area isn't done yet (mostly around towns), but other areas are coming along.
Here's Ridgway - this is one of the areas where I've hinged the fascia, to allow access to the hidden track behind, and to make it easier to install controls into the fascia later:


And here's the area near the Enterprise branch:
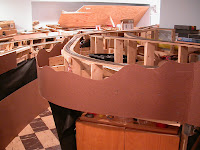
And finally, a shot of the area near Ophir's bridge 45-A (to the right of this photo), showing the prep work for another piece being added. I'm using 1x2s on edge where I can, as something to either screw or glue the fascia to:

I (mostly) finished the 4 diesels I've been remotoring... decals are done, headlights are done, decoders are installed, and they are reassembled and operating. There's a few final delicate details (air brake hoses, cut levels, etc) that aren't added yet, and weathering isn't done, but other than that they're ready for the layout.
The layout, on the other hand, is back in the land of carpentry, as I've been adding fascia boards to most of the layout. I'm using untempered 1/8" masonite, and so far I've got about half of the layout done. There's a few sections that will have to wait, since wiring in the area isn't done yet (mostly around towns), but other areas are coming along.
Here's Ridgway - this is one of the areas where I've hinged the fascia, to allow access to the hidden track behind, and to make it easier to install controls into the fascia later:


And here's the area near the Enterprise branch:

And finally, a shot of the area near Ophir's bridge 45-A (to the right of this photo), showing the prep work for another piece being added. I'm using 1x2s on edge where I can, as something to either screw or glue the fascia to:

Apr 15, 2008
Still working on decoders!
I'm still working on those diesel rebuilds, but they're nearly done now. After figuring out that the headlight LEDs could be wired back-to-back, I'm on to the next phase. The LEDs look great; I've got one each for the upper / lower headlights, and only one comes on depending on which direction the loco is facing on the track. I ended up using 1.2k resistors, and the brightness looks about right to me. Track voltage w/ my Keller Onboard system is 14.5v DC. I mounted the LEDs by soldering a pair back-to-back w/ the right spacing (to match the headlights on the shell), filing the end of each LED flat, and super-gluing them to the rear of the headlight lens.
With the headlights done at last, I moved on to connecting the A- and B-units, installing the Keller decoders (called throttles actually) in the B-units, and routing some small stranded wires between the two units. On the F units, I mounted Kadee #47s (I think - short shank, underset, metal) couplers, and was able to run a wire thru each of the ear holes on the Kadee boxes. I used shrink-tubing to attach a second wire to each of these, and thus got four wires routed alongside the coupler boxes, looking almost like MU cables. Two wires carry motor power from the decoder in the B-unit, and two carry track power to the decoder.
What's left? Final details on the shells, and (probably later on ) weathering. Air brushing is another long-dormant skill, so I'll have to get back up to speed there as well. But with 4 new Keller-equipped locos, I'll probably focus next on getting Keller installed on the layout, so I can use these new guys.
I've also finally posted a newer version of the layout trackplan. I had created a design in Empire Express for another friend, and a fringe benefit of that is that I really learned how to dress up the drawing within that software package. What do you think?
Mar 31, 2008
Keller OnBoard and headlights
So, here I am, sitting at home and quietly finishing up super-detailing my 7 locomotive shells that I've been working on the past few weeks. Yesterday I finished up the last of the tiny decals I like to add - fuel & water labels, warnings, other little tidbits. I'm been using using diesel decals sets from Rail Graphics, purchased quite a few years ago - the last time I did this work, about 1991 believe it or not.
I also re-numbered one of the Athearn PA units (why must all PA-1 units out there be numbered 6009 !?), and finished up add numbers to the number boards of my Athearn PA and a pair of F7As. Not fun, but I did enjoy learning how to do it.
I suppose I should photograph these models when they're complete so you can see what I've been doing.
Anyway, back to Keller Onboard... I switch my focus to electronics, starting with the Lifelike Proto2000 PA / PB pair, which I thought would be the easiest. I had purchased a number of the 8-pin 2x4 NMRA plugs a while back, and soldered up just the track & motor connections on one of them, and plugged it into the NMRA plug on the PA to test it. The motor ran nicely w/ Keller, but no lights.
Of course - I hadn't jumpered the headlight connections. But, after some more experimenting, I found that the two headlight circuits are both polarity-sensitive (pins 6-7 for the oscillating headlight, and 3-7 for the lower headlight & numberboards). The oscillating headlight varies two circuits, to light two filaments inside one bulb to get the oscillating effect - about +/- 5v going to the bulb, but working on with pin 7 positive and 6 negative (I think - I might have it backwards). The lower headlight is just 1.5v, and again works w/ only one polarity.
With DCC, the decoder would provide the correct voltage and power to control these separately, and with normal DC both work but only when the locomotive's moving forward. The problem for me is that the rails will have a set DC polarity, regardless of which way the locomotive is moving. Thus, if the locomotive is on the rails facing west the headlights would work, but facing east they'd be off, regardless of whether it was moving or not.
I could replace both with my golden-white LEDs from NCE, and probably will I guess. I like the oscillating effect, but it uses the locomotives electronics and needs that certain polarity. I could light that bulb directly from track power (skip the electronics), and use a resistor to get down to 5v or so. No oscillating, but easier wiring. Or, I could replace both bulbs with the LEDs wired back-to-back, so that one LED would work for each direction the loco's facing.
I did finally figure out how to address the reverse-voltage problem... those LEDs don't like reverse voltage, and the Keller Onboard system puts 14.5v on the tracks. Turns out that with the LEDs back-to-back, one will light and the other won't, and the dark LED is protected from the reverse voltage by the current running thru the LED that does light. Assuming a current of 30 mA, I'll use a 3660 ohm resistor on one side of the two wires running to the LEDs. This is what I plan to use w/ the other locos.
What to do w/ the LifeLike unit? Not sure yet... I'm leaning now toward just lighting the two bulbs directly with appropriate resistors, if I can guess what their current draw is.
Subscribe to:
Posts (Atom)

 Posts

